Chimney Rock, NC -- October 2002
Audiovox CCS-100 Cruise Control
August 2003
Medium Sensitivity Setting
Tach Signal Wire (blue) Special Consideration
Chimney Rock, NC -- October 2002
Audiovox CCS-100 Cruise Control
August 2003
Medium Sensitivity Setting ![]()
Tach Signal Wire (blue) Special Consideration ![]()
| After doing some research into
aftermarket cruise controls, not liking the "add-on" look of any
of the stalk mounted controls that came with most, and then being inspired
by a posting
on Miata.net I set out to find an Audiovox
CCS-100 kit. I found one at Autozone in Daytona Beach for
$99.95. I understand that it may be available for less ($89.95 I was told)
online, (Summit Racing shows it
in their online catalog but doesn't list a price).
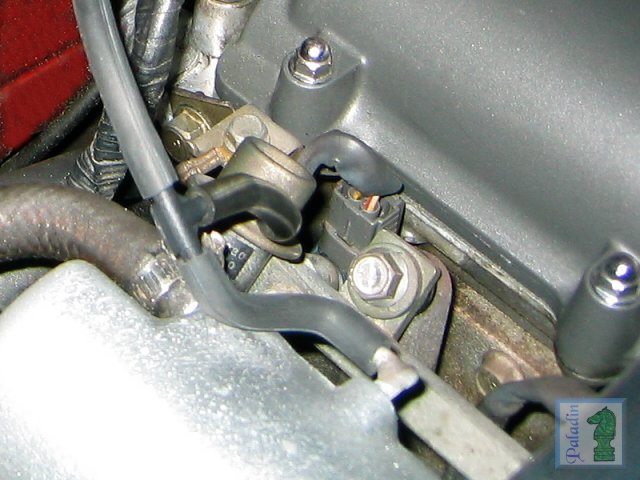
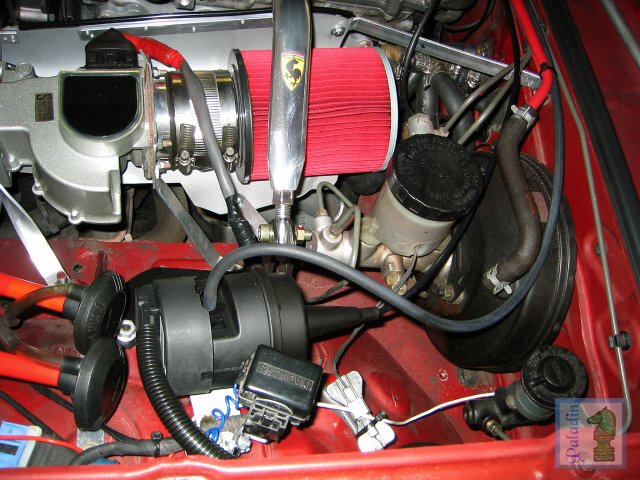
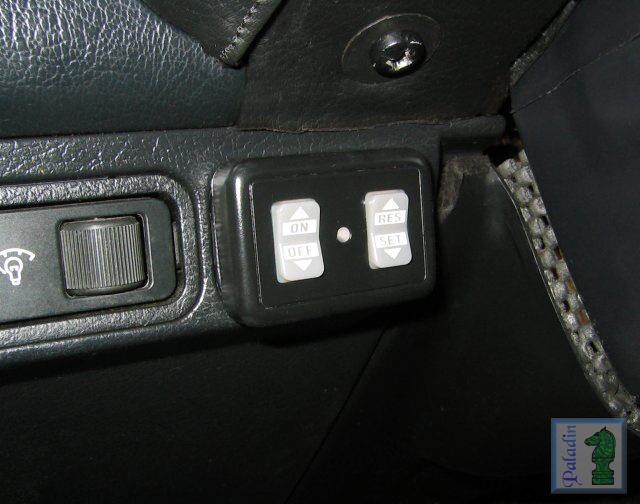
The photos below show the servo cable connection to the throttle body, the vacuum connection to the intake manifold, the servo/control module mounted on the driver's side shock tower, and the dash mount control panel mounted just to the left of the steering wheel. |
|||
|
|
|
|
|
| The kit consists of the servo
control (which incorporates the control module electronics), the dash
mount control panel (gray plastic like the inside of a Bonneville, backlit
via two green LEDs that connect to the dash lights), all
necessary wiring including a length of split loom (a nice touch!), a
length of vacuum hose; and a wide variety of mounting brackets, throttle
cable adapters, screws, bolts, wire ties, a grommet for the firewall, and
vacuum tees and reducer couplings, and more! In short just about
everything you'll need. You may need some other electrical
connectors if like me you are adverse to Scotchlock taps and
connectors.
The servo/control module is 3-1/4" in diameter, its main body is a bit over 4" long with a 2" or so "snout" for the control cable. The cable's outer sheath extends 44" from the servo body, the exposed inner cable with the supplied ball chain and adapters cann add a foot or so to the overall cable length. The wiring harness for the servo plug has a nice snaplock single row plug-in connector (like an older PC power connector). This conencts to a header in the servo's wiring box, the wiring box cover has a dual foam seal that keeps the nasties out. Click here to link to the CCS-100 manual from Audiovox' website (an Adobe Acrobat .pdf file) Installation of the servo, and connection of the throttle cable and vacuum line, was quite easy and straightforward. The first photo above shows the cable connection at the throttle body, I used the parallel throttle cable clamp adapter and the longer of the two throttle wire loops that come with the kit. I tapped the vacuum line in at the rear of the intake manifold (the second photo), placing a tee (also included in the kit) into the hose connecting vacuum to the fuel pressure regulator. Inside the servo's wiring box there's a 7-position DIP switch that needs to be configured--in theory using the settings provided in the installation manual and reference guide (a 50 or so page tabular listing by make an model). Switches 1 and 2 control the PPM (Pulses Per Mile) setting, allegedly for the speedometer signal (more about this later), the reference guide says to set this for 4,000 PPM--I did. Switch 3, Speed Signal, tells the control module whether you are using both the Tach and VSS (Vehicle Speed Sensor) signals, or just the Tach--I set it for both, this was wrong (more later). Switches 4 & 5 set the unit's sensitivity (LOW for light vehicles with high HP, MEDIUM for most vehicles, or HIGH for low power/heavy vehicles), I initially set this to MEDIUM. Switch 6 tells the control what kind of control switch you're using, normally open or closed (the included dash mount switch unit is normally open). The last switch is the Tach Select Source, ECM (Engine Control Module) or COIL (duh!). For the Miata set this to ECM. The third photo shows the servo (the electronic control module is incorporated into the servo), mounted on the driver's side using the bolt that holds my custom diagnostic connector bracket. I also used one of the M6 hex head sheet metal screws from the kit to further anchor the servo. With this arrangement (servo on the driver's side by the shock tower), the servo cable and included vacuum hose fit nearly perfectly--in fact the under hood installation has a very "factory" look. The CCS-100 requires a number of connections to your car's electrical system, Unfortunately, the wiring instructions are quite generic and therefore can be misleading and confusing. From the servo unit, there's a short (15" or so) black wire from the servo unit with a 6 mm ring connector that needs to be connected to a chassis ground (I used the servo mounting bolt), and a blue wire that connects to the -Ign terminal in the diagnostic connector (I tinned the twisted wire, and just "plugged" it in to the diagnostic connector). There are 6 wires (actually 5 wires and one coaxial cable) that have to go through the firewall. I punched through the rubber seal for the main harness just below the fender mounted relay panel and dragged 'em through with a wire coat hanger. The coaxial cable terminates with a black and a gray lead that are intended to connect to the VSS--for the NA Miata they say to connect this to the RSW (Reed SWitch) terminal on the rear of the speedometer; don't bother (more about this later). Two more wires connect to the stoplight switch, a red wire to the "hot" side of the switch (the white/green wire on my '90), and a purple wire to the "output" of the switch (the green wire). There's also a power pigtail (orange) with an inline fuse, and a red wire coming out from the fuse holder, that needs to be connected to a power source that is hot when the key is on (I used the cigar lighter power). The other wires (the red wire from the power pigtail, and yellow, brown, and green wires from the servo/control module), have Molex type pin connectors crimped to them and connect the to control switch using a 4-pin Molex connector (like a hard drive power connector). The switch unit also has a black wire that needs to connect to a good ground, and a gray wire that can connect to the dash lighting or the parking lights for it's illumination. I got lazy here and just connected it to the power source (the red wire)--this means that the switch's backlighting is on all the time, but they're LED's that don't use much power, will last longer than me, and aren't visible in daylight anyhow. If you wanted these to be switched with the parking lights you could connect the gray wire to the red/black wire on the dash lighting dimmer switch. I mounted the control panel in the rightmost of the three auxiliary switch locations (photo four) to the left on the steering column (I think the OEM rear window defroster switch goes there). The switch blanks are two-piece affairs, I removed the center plug and just stuck the control panel to the surround using the preinstalled double sided tape. The panel's cover snaps on (and therefore off), so I popped it and have painted it satin black--I lost the silk screened Cruise Control, and Accel and Coast labeling, but I think I'll be OK... So, I got it all in and rechecked my connections (including the RSW connection, the grey wire, to the speedometer), and took to the open road. Accelerating to 45 MPH or so I turned on the unit and pressed the Set button--releasing the accelerator in anticipation of some controlled cruising. I instead got nothing, nada, zip--no cruise control, back to the shop. I once again checked my wiring, and the control module's DIP switch setup. Everything seemed OK, but on a hunch I changed the Tach signal source to COIL, my reasoning being that the 1.6L Miata doesn't really have a modern type ECM signal (the signal at the diagnostic connector is the same signal that fires the ignitor)--back to the road. Nothing, no cruise control...back to the barn. I got out my wiring diagrams and looked at the RSW. It's just a reed switch activated by the viscous magnetic coupling in the speedometer, one terminal connected to ground, the other just dead-ended at the RSW terminal. I.e. it is NOT an active signal, it could "pull-down" a signal to ground, but it does not generate any pulses per mile. Remembering the Speed Signal setting (DIP switch 3), I set that to Tach Only and disconnected the gray wire to the RSW terminal--back to open road... I got up to 45 or so, turned it on and pressed Set, and immediately felt the servo take over, YAY!!! Let's try 60 MPH, says I... Nothing, it won't lock in. Playing with it I found that it wouldn't Set at any speed over 52 or so, and also 52 was as fast as I could accelerate to using the Accel function--back to the garage... Trying to control my frustration (and having to get this thing working before the wife got home and found out I blew $100) I got to thinking about this PPM, pulses per mile thing. The manual says this setting works in conjunction with the VSS (RSW in the Miata) signal, which I had now disconnected. But since the Miata uses a wasted spark ignition system I thought I might as well try the 8,000 PPM setting--I mean heck, the worst thing that can happen is that I let the smoke out of my $100 cruise control unit (and she can only kill me once)--back out to open road. OK, 45 MPH locked, let's go for 60... YAY!!! I'm cooking, so let's find a secluded place where the FHP doesn't go... Cool, 90 MPH and locked! That's it--don't bother with the VSS (gray wire), so there's no need to yank the instrument cluster. Set DIP switches 1 & 2 for 8,000 PPM, switch 3 for Tach Only, and switch 7 for ECM (I switched that back when it didn't work on COIL). I used it today on a 100 mile round trip to Jacksonville and found that it worked well, but seemed a bit sluggish on what passes for hills here in NE Florida. I stopped and changed the sensitivity (DIP switches 4 & 5) to LOW (light vehicles with high HP) and that fixed it, it now holds the set speed within +/- 1-1/2 MPH or so. So, the bottom line is that this is a nice, inexpensive, very compact cruise control kit that works well. The installation instructions are a bit too generic, and use inconsistent nomenclature, and the recommended connections and settings for the NA Miata (at least the 1.6L models) are just plain wrong, but once set up correctly I like it! |
|||
| Medium
Sensitivity Setting: During a recent trip through the Florida Mountains, on I-10 around Tallahassee (I got up to 236 feet above sea-level at one point!), I experimented with the other sensitivity settings and found that in that rugged terrain the MEDium setting (DIP switches 4 & 5 OFF) worked best to hold the speed within +/- 1.0 MPH. Using the LOW setting in the hills I was experiencing a wider control range (+/- 2.5 MPH or so) than in the flatlands over here in Saint Augustine. The MEDium setting makes the RESUME function bite a bit more forcefully, and makes the overall control more aggressive--but not objectionably so... |
|||
| Tach
Signal Wire Considerations: Jason Bray sent me an email telling me of his experiences installing the CCS-100 in his supercharged Miata. He had to mount the control unit on the passenger's side and had at first run the blue tach signal wire around behind the engine, near and past the ignition coil. This didn't work due to the RFI/EMI induced "noise" in the tach signal wire that confused the CCS-100 control. The manual speaks to this issue, but not really in an "in-your-face it ain't gonna' work if you do this" manner. Once Jason relocated the wire to run around the front of the engine compartment he was all set for some Controlled Cruisin'!!! Thanks to Jason for highlighting this issue! |
|||
Return/Goto My Miata Home Page

Persian mythology gave the name Ahura Mazda
to the god of light...
cliffyk@paladinmicro.com